Showing posts with label Patterns to Share. Show all posts

Tuesday, April 6, 2010

"Strip and Flip" Tutorial

The "Strip and Flip" process is a fun way to bust those scraps. I have drawers of pre-cut strips: 1.5", 2.0", 2.5", 3.5", 4.5" and 6.5". When some of the drawers overflow, I begin to play.


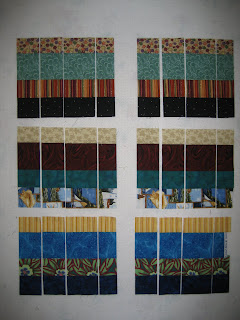
The following strips are about 21-22" long, in widths of: 2.5", 2.5", 3.5", 2". I sort them trying to keep a contrast between the strips. I also use strips in lengths of 10.5-11". You can use the WIF, however I like to cut them down to avoid wavy seams - they happen to the best of us.


After sewing the sets together, press all seams in one direction. Now cut them in the SAME widths, same order: 2.5", 2.5", 3.5" and 2".


Now "FLIP" the 2nd and 4th within each strip set. Notice -- No seams to match!


More play: Mix them up between strip sets. Notice that one of the strip sets was a little short. Save the good ones to mix with other blocks that come up short! The finished block is 8.5".


Here is a finished quilt top in bright scraps. The blocks are sashed with 2" wide strips, the inner border is 2.5", outer border is 6.5". Finished quilt top: 57.5"x67.5".


I have also made tops with 5-strip blocks in various sizes....one of them on point. Have Fun!

Saturday, March 20, 2010

Scrappy Half Hexagon Quilt Pattern

Disclaimer: I am NOT a professional quilt pattern writer. This is a very simple use of the EZ Tri Tool Ruler discovered playing with different fabric scraps.

Materials and Supplies Needed:

  • 2 1/2" strips of various fabrics (scraps are the best)
  • EZ Tri Tool Ruler ("EZ")
  • Small numbered scraps of paper to label rows
  • Design Board (floor, table, etc.)

Rotary Cutting Half/Hexagon ("HH") Pieces and Layout Instructions

  • Stack six (6) layers of 2 1/2" strips (2 of each color). Using the EZ Ruler, line up the 2 1/2" line at the top of strips. First cut....cut both sides, then flip the ruler aways lining the 2 1/2" mark on the fabric strips.


  • After cutting a dozen or so sets of HH, move them to the design area and start building your desired layout and size. I tend to work from the "hip", that is, play until I am happy. My preferred method...cut several HH, lay them out, cut several more, lay them out...etc. See these two examples: Kaffe and Brights

Assembly, Trimming, Borders

  • After you are satisfied with the layout and size, pin a numbered label on the first HH of each row.
  • One row at a time, sew each HH across, finger pressing the seams to the left on odd numbered rows, to the right on even numbered rows. As each row is finished, join it to the previous row(s) and press with the iron. I do NOT pin, the seams nestle as I sew...however it is your choice.
  • Trim the sides after the top is assembled.


  • Using your favorite method for measuring the borders, attach a 2 1/2" inner border and 6 1/2" outer border.

I have not finished the Bright HH, however here is the link to the finished Kaffe.